When working with the Oracle Client, IT Pros often need a consistent, repeatable installation method across multiple systems, and one of the most effective ways to achieve this is by creating a custom installation from a response file.
In this article, you’ll learn how to build a customized Oracle Client installation using a response file and how to implement it step by step.
What Is a Response File?
A response file is a configuration file that contains predefined answers to installation prompts. Instead of manually stepping through the graphical installer, you can use this file to automate the process.
The Oracle Universal Installer reads values from the response file and uses them to complete the installation either silently or with minimal interaction. When using the -silent option, installations can run without displaying GUI screens.
Why Should You Use a Custom Response File?
Creating a custom response file gives you full control over how the Oracle Client is installed. Rather than relying on generic installation switches, you can define:
- installation type (Administrator, Runtime, Instant Client, or Custom)
- installation directories (ORACLE_HOME and ORACLE_BASE)
- components and features
- system configuration preferences
Furthermore, once created, the same response file can be reused across multiple machines, making it ideal for enterprise deployments.
Step-by-Step: Creating a Custom Response File
1. Launch the Installer Manually
Start by running the Oracle Client installer (setup.exe) in interactive mode. This allows you to configure all installation options through the graphical interface.
During this step, select your preferred installation type, paths, and components.
2. Save the Response File
When you reach the Summary screen in the installer, click on “Save Response File”, name it something meaningful, such as Oracle19Client_Install.rsp. Save the file to your installation directory (e.g., C:\Downloads\Oracle19c_64bit\client).
This file will contain all the configuration choices you made during the setup process.
3. Exit the Installer
After saving the response file, cancel and exit the installation wizard. You don’t need to complete the installation at this stage because your goal is to capture the configuration.
4. Create a Silent Install Script
Next, create a command script to execute the installation using the response file.
For example, if you use the PowerShell Application Deployment Toolkit, your command line should look like this:
Execute-Process -Path "setup.exe" -Parameters "-silent -nowait -noconsole -waitForCompletion -ignoreSysPrereqs -ignorePrereqFailure -responseFile `"$dirFiles\Oracle19Client_Install.rsp`""How PacKit Can Help You In This Process
While response files make Oracle Client installations easier, managing them across multiple applications, versions, and environments can quickly become complex.
PacKit can be very useful in this situation.
PacKit is designed to help IT professionals manage, organize, and deploy application packages from a centralized interface. It bridges the gap between packaging and deployment, allowing you to standardize workflows and reduce repetitive tasks.
All you have to do is define the install and uninstall command lines:
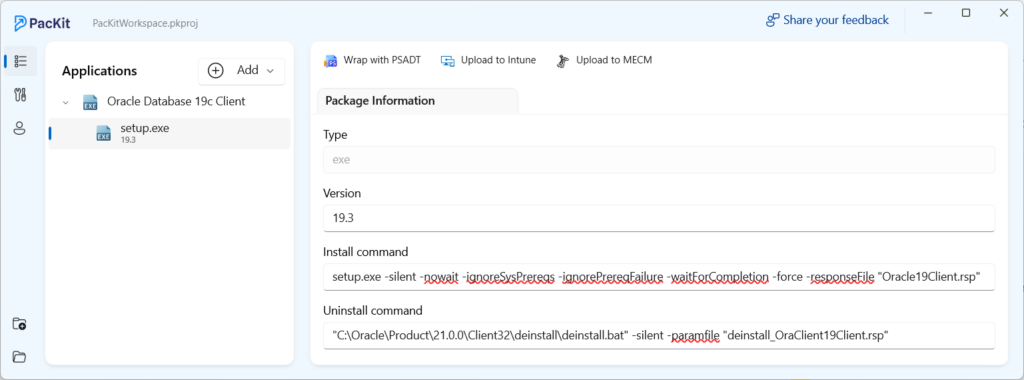
Once that’s completed, you can use PacKit’s PSADT and Intune integrations to wrap your installer in PSADT, convert it into an .intunewin file, and upload it to Intune with just a few clicks.
For more details, check out Wrapping Win32 apps with PSADT for Intune Deployment.
Conclusion
By capturing your configuration once and reusing it, you can dramatically simplify deployments while maintaining consistency across environments.
Whether you’re managing a handful of clients or a large enterprise infrastructure, response file-based installations provide a reliable, scalable, and efficient solution for Oracle client deployment.
Final Takeaways
- A response file is a configuration file that contains predefined answers to installation prompts. Instead of manually stepping through the graphical installer, you can use this file to automate the process.
- The Oracle Universal Installer reads values from the response file and uses them to complete the installation either silently or with minimal interaction.
- Creating a custom response file gives you full control over how the Oracle Client is installed.
- Rather than relying on generic installation switches, you can define installation type, installation directories, components and features, and system configuration preferences
- Steps on creating a custom response file: launch the installer manually, save the response file, exit the installation wizard, then create a silent install script
- PacKit can speed up the process: just define the install and uninstall command lines, then use the PSADT and Intune integrations to wrap your installer into PSADT, convert it into an .intunewin file and upload it to Intune
Here are some of PacKit’s post-packaging configuration and deployment features:
- PSADT Wrapper
- IntuneWin Auto-Generator
- App Catalog – WinGet
- Command Line Finder
- Intune Detection Rules
- Intune OS Requirements